Gitではfileが6つの状態に遷移する
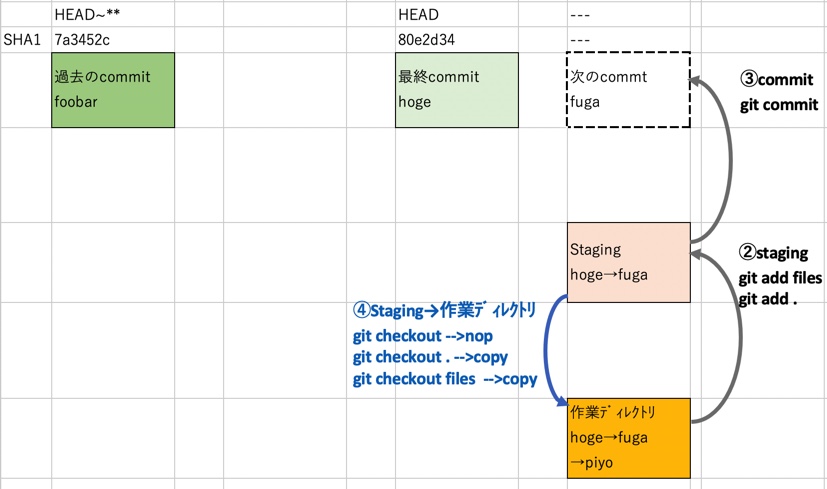
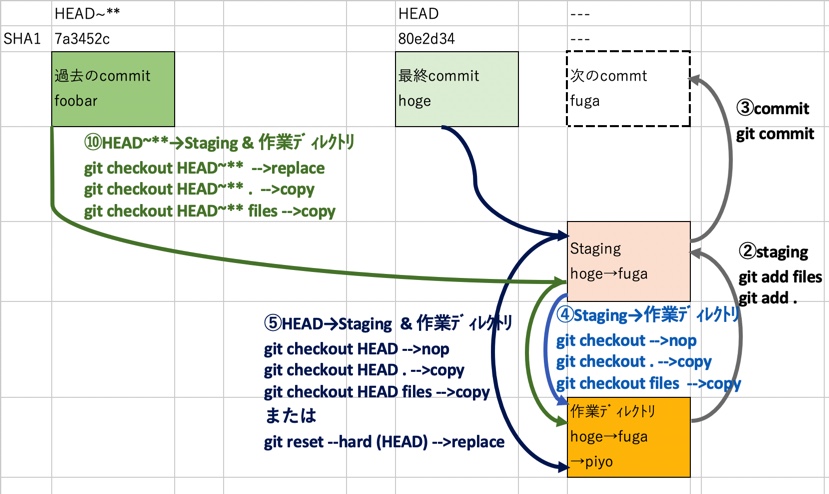
Gitではいわゆる3大ツリーである、commit(commit履歴)、staging(ステージング、index、インデックス)、作業ディレクトリ(Working directory)を用いてfile管理を行なっている。
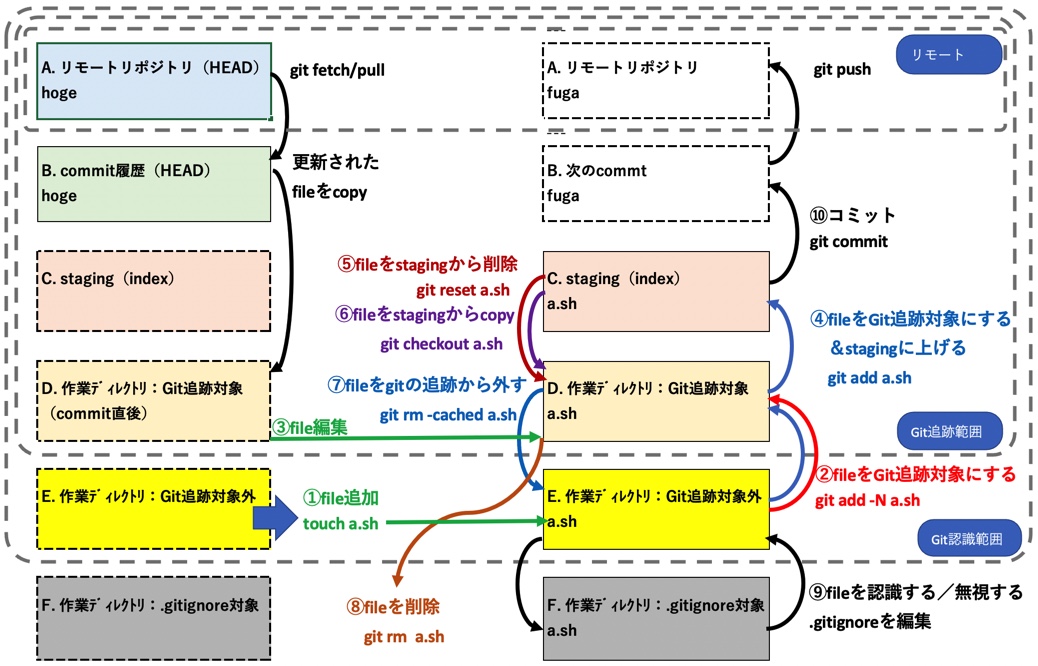
これをもう少し細かく見るとfileには以下の6つの状態がある事がわかる。
- fileをpushした状態
- fileをcommitした状態
- fileをstagingした状態
- fileをgitが追跡する状態(
git addした事がある作業ディレクトリ内のfile) - fileをgitが追跡しないが認識する状態(新規file等の作業ディレクトリ内のfile)
- fileをgitが無視する状態(追跡も認識もしない作業ディレクトリ内のfile)
この6つの状態と遷移を表にまとめ、以下丸数字に従って説明する。
①$ touch files →fileを作業ディレクトリに追加
touch,mvなどで作業ディレクトリに新規fileが追加された段階からGitはfileを認識する。
$ touch a.sh b.sh c.sh       # - a.sh, b.sh, c.shの3fileを新規作成
$ git status                 # - 状態を確認
On branch main
Untracked files:
  (use "git add <file>..." to include in what will be committed)
    a.sh                     # - 各fileを追跡対象外fileとして認識している
    b.sh
    c.sh

nothing added to commit but untracked files present (use "git add" to track)
$
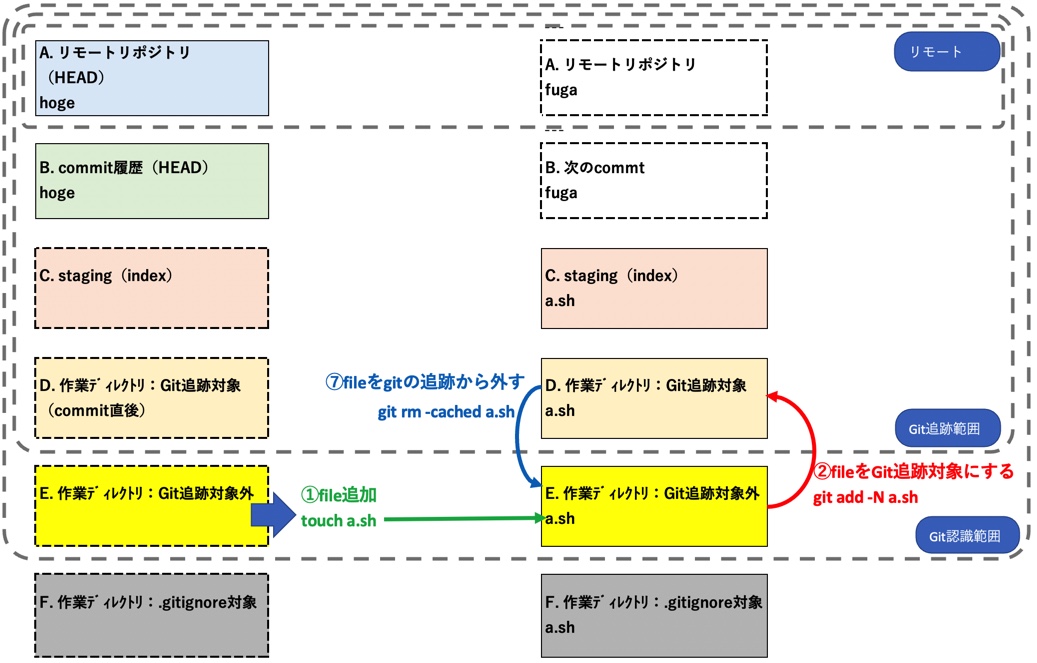
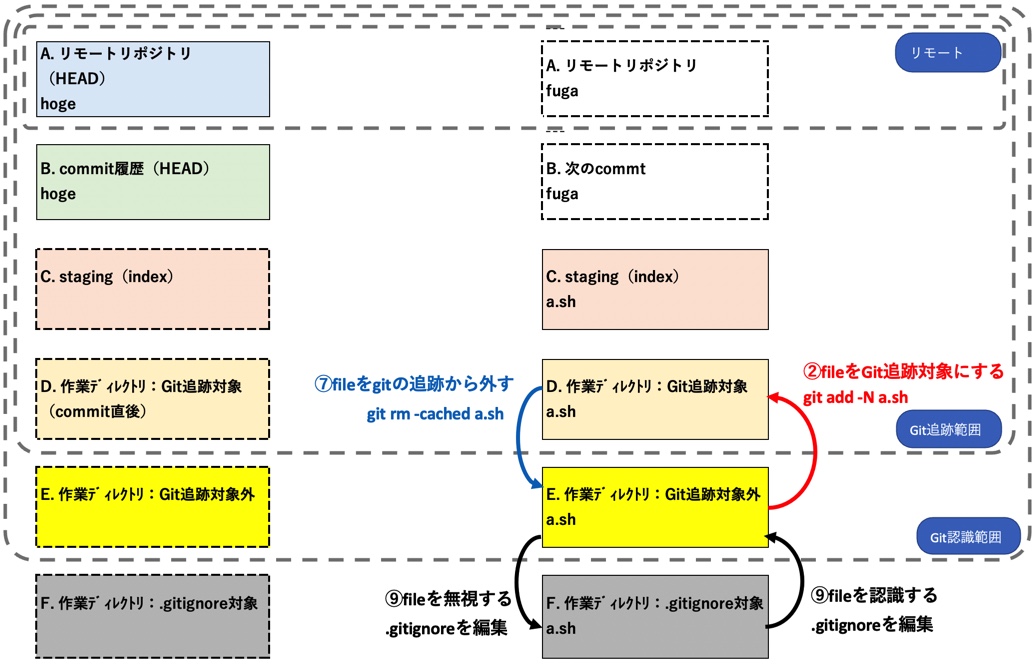
②$ git add -N files →fileをgit追跡対象にするがstagingはしない
一般的にはgit add filesでfileをGitの追跡対象にすると同時にstagingするが、 git add -N filesを使うとGitの追跡対象にはするがstagingはしない。何のためにその様な状態にするのか?というと、stagingはまだしたくないが、新規作成したfileをGitの配下に置いて差分をgit diffでいつでも見たいといった運用が出来る。例えばgit add -N .と打つと、作業ディレクトリ内のfileをすべてGitの追跡対象に出来るので、差分を確認しながら編集を行い、整ったものからstagingが出来る。
逆動作になる後述の「⑦fileをGit追跡対象から外す」と合わせた図表を示す。
$ git add -N b.sh.          # - b.shをgit追跡対象にする(stagingはしない)
$ git status
On branch main
Changes not staged for commit:
  (use "git add <file>..." to update what will be committed)
  (use "git restore <file>..." to discard changes in working directory)
    new file:   b.sh        # - 追跡対象になったがstagingされていない状態

Untracked files:
  (use "git add <file>..." to include in what will be committed)
    a.sh                    # - 追跡対象外fileとして認識中
    c.sh

no changes added to commit (use "git add" and/or "git commit -a")
$
③$ Vim files →Git追跡fileを編集する
上記①ではfileを新規作成したが、理解を深めるべく別のパターンとしてGit追跡fileを修正した場合を加える。後述の⑤の2つの図で違いが分かる
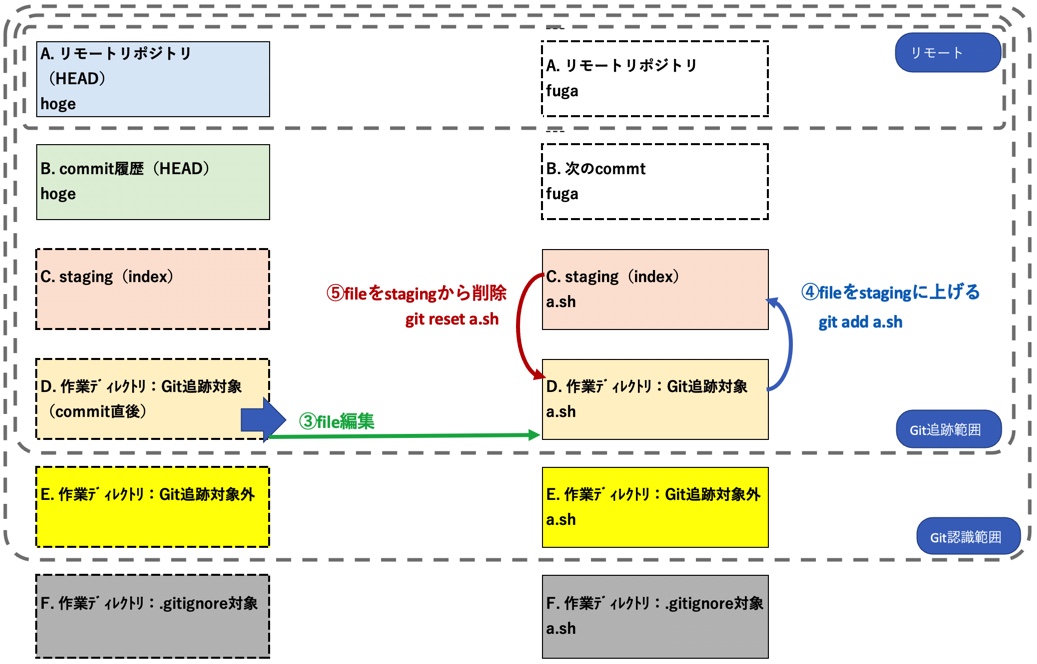
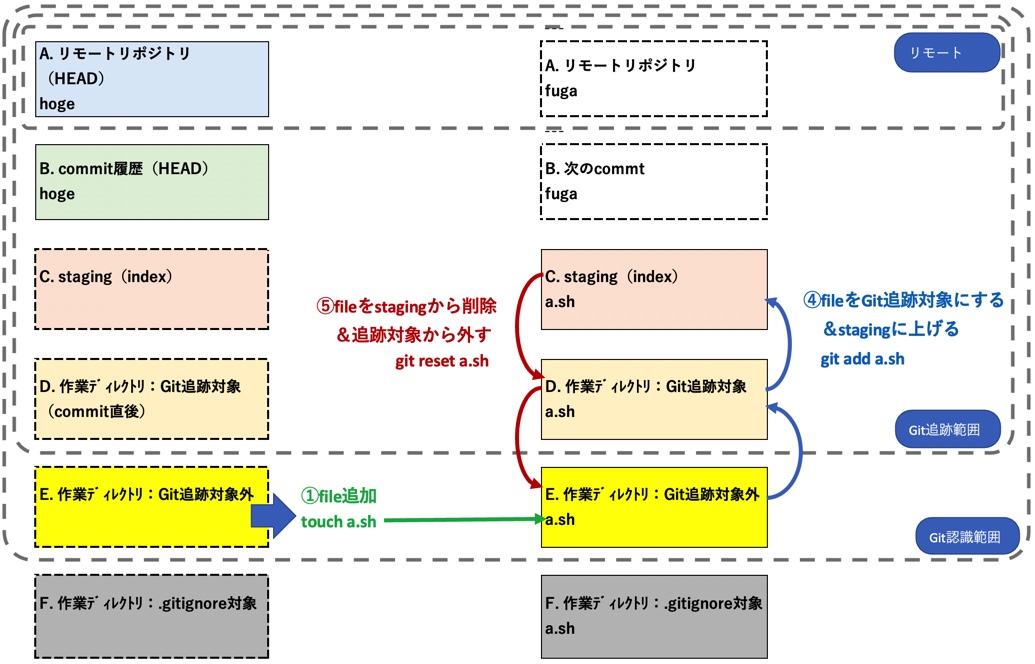
④$ git add files →fileをstagingに上げる
対象fileが上記③の様にGitの追跡対象ならgit add filesでstagingする。また対象fileがGitの追跡対象でない場合は追跡対象fileにした上でstagingする。次の⑤のresetコマンド動作と対になるので、fileが追跡対象外の時と追跡対象時のgit add filesコマンドの動作の違いをresetの項にある図表で確認して欲しい。
$ git add a.sh             # - a.shをstagingする
$ git status
On branch main
Changes to be committed:
  (use "git restore --staged <file>..." to unstage)
    new file:   a.sh       # - 追跡対象になり、かつstagingされた

Changes not staged for commit:
  (use "git add <file>..." to update what will be committed)
  (use "git restore <file>..." to discard changes in working directory)
    new file:   b.sh        # - 追跡対象になったがstagingされていない状態

Untracked files:
  (use "git add <file>..." to include in what will be committed)
    c.sh                    # - 追跡対象外fileとして認識中
$
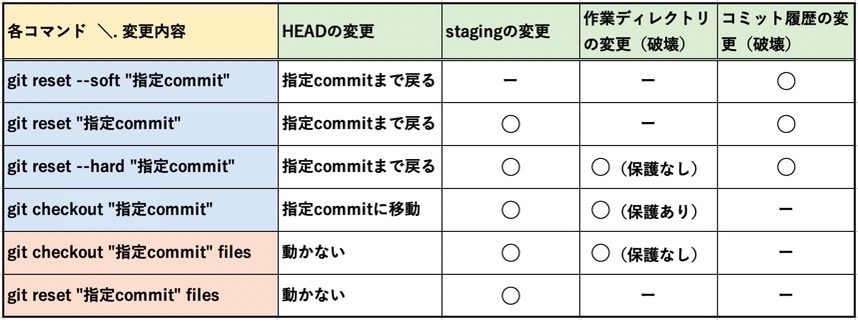
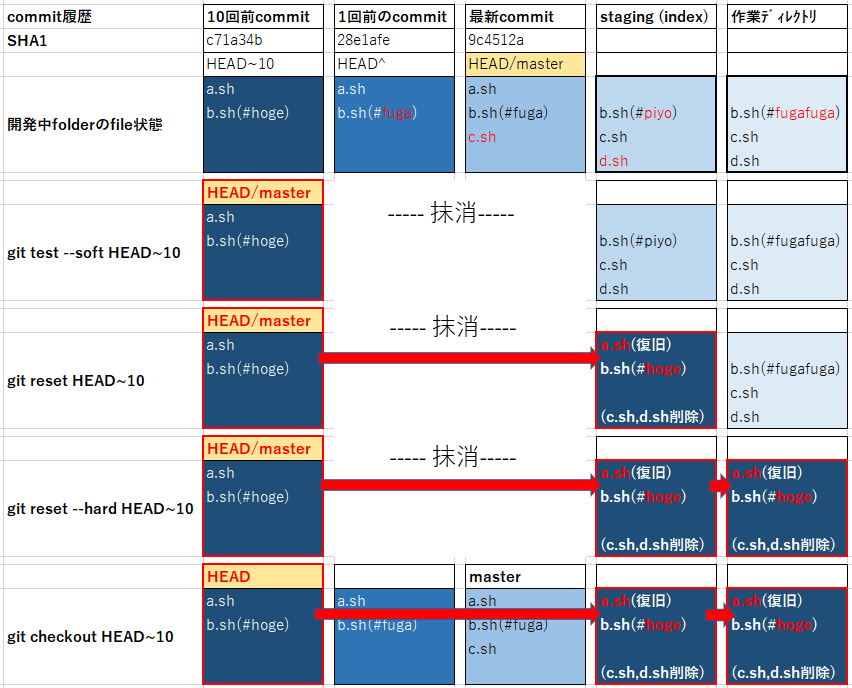
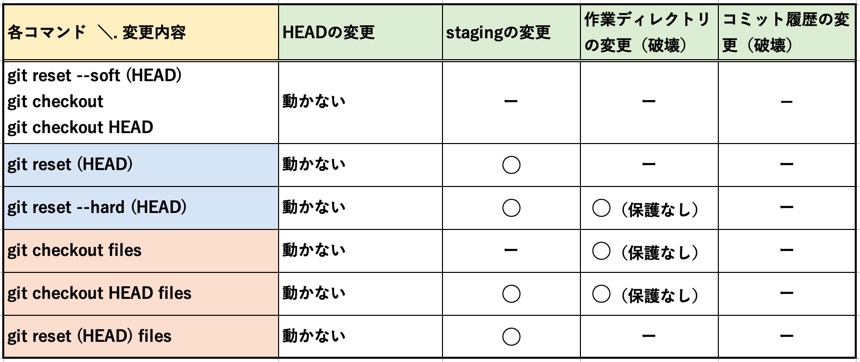
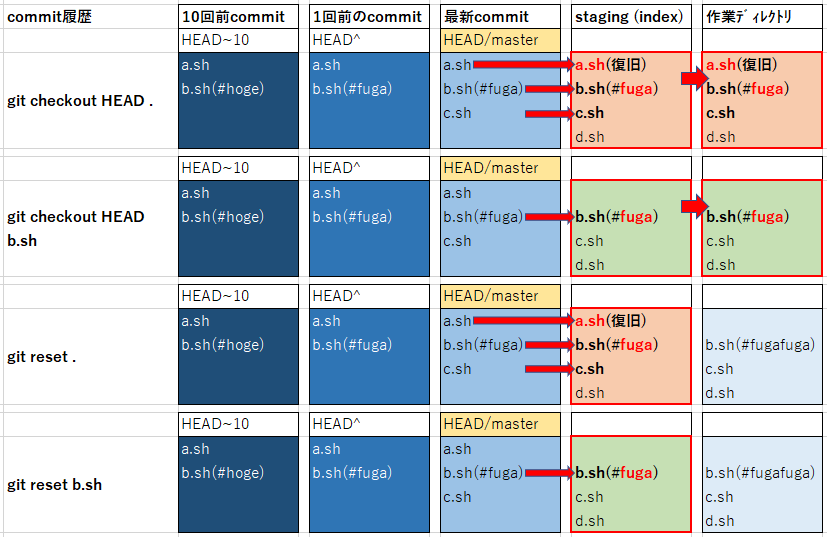
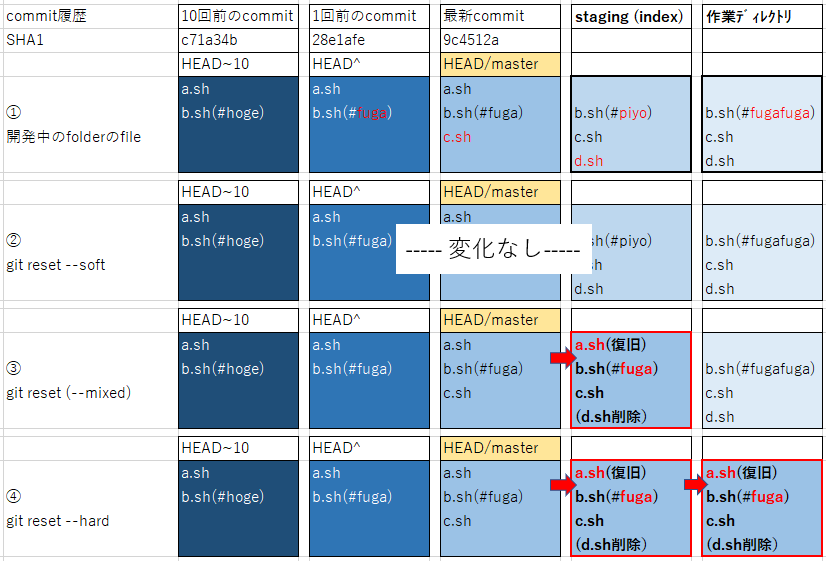
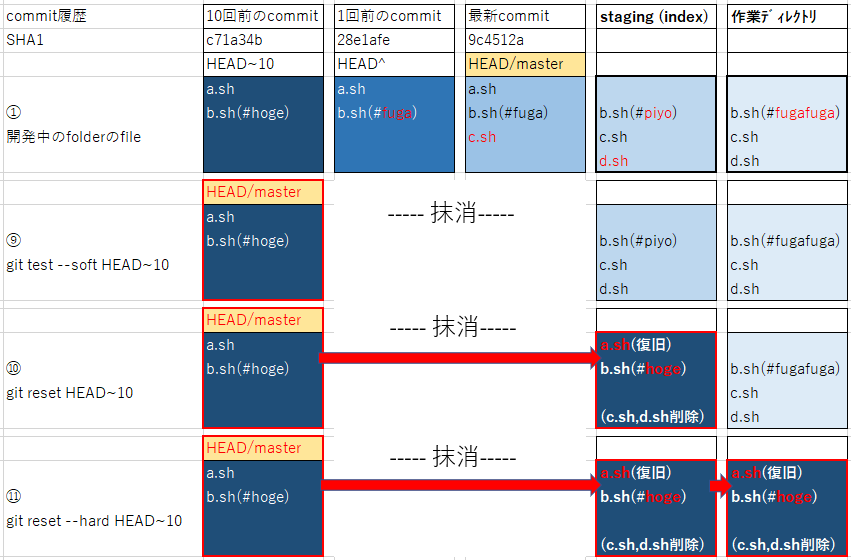
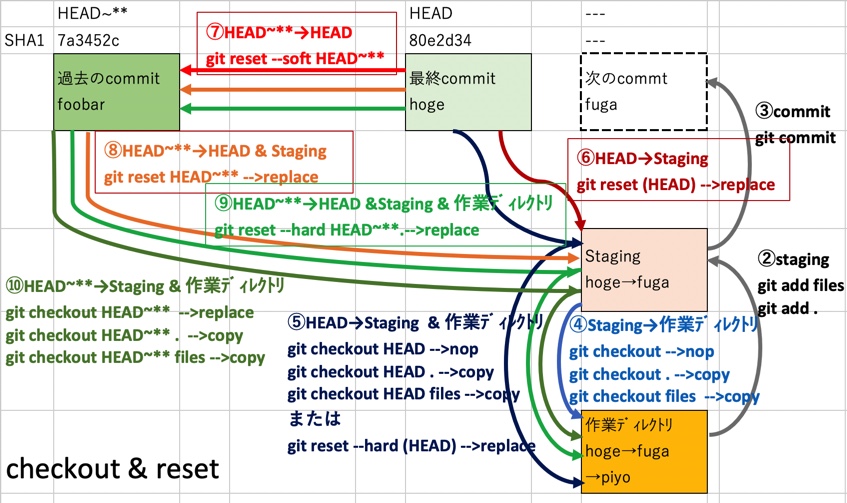
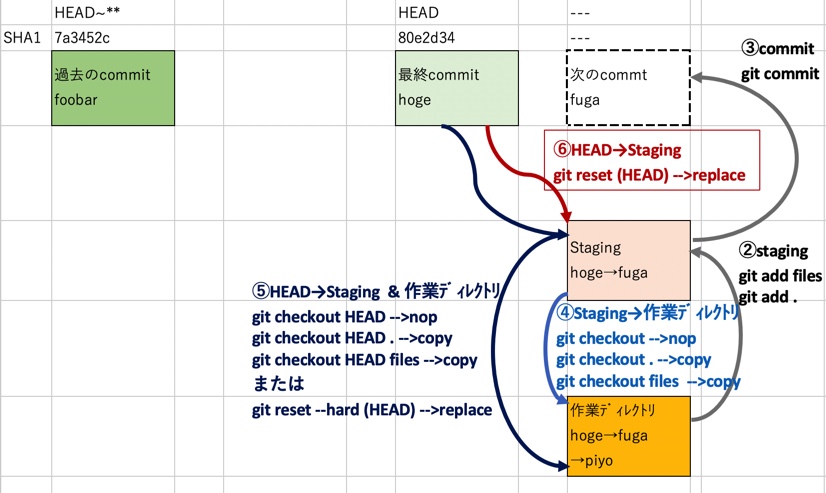
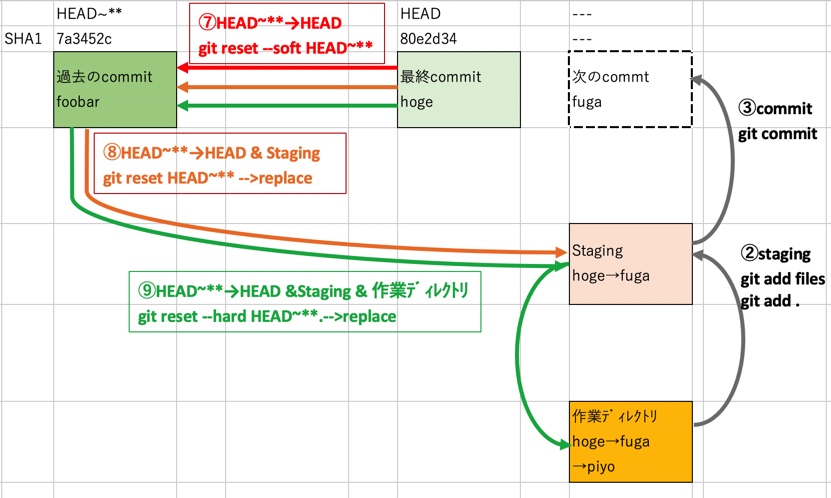
⑤$ git reset files →fileをstagingから下ろす
stagingしたfileを破棄する(unstaging)。作業ディレクトリ内のfileは変化しないが、対象fileの過去のcommitの有無で扱いが変わる。一度でもcommitした事があるfileは引き続きGitの追跡対象だが、commitした事が無ければGitの追跡対象外になる(addの逆動作)。
以下、対動作となる「③fileをstagingに上げる」も記載した図表を、対象fileのcommit実績の有無別で示す。
fileがcommit実績ある場合:unstagingだけを実施
fileがcommit実績ない場合:unstagingして、Gitの追跡対象からも外す(⑤+⑦の動作)
$git reset a.sh              # - a.shのstagingを取り消す
Unstaged changes after reset:
A   b.sh
$ git status
On branch main
Changes not staged for commit:
  (use "git add <file>..." to update what will be committed)
  (use "git restore <file>..." to discard changes in working directory)
    modified:   a.sh         # - 1回はcommitしたfileは引き続きgitの追跡対象
    new file:   b.sh

Untracked files:
  (use "git add <file>..." to include in what will be committed)
    a.sh                     # - 未commitのfileはgitの追跡対象外になる
    c.sh

no changes added to commit (use "git add" and/or "git commit -a")
$
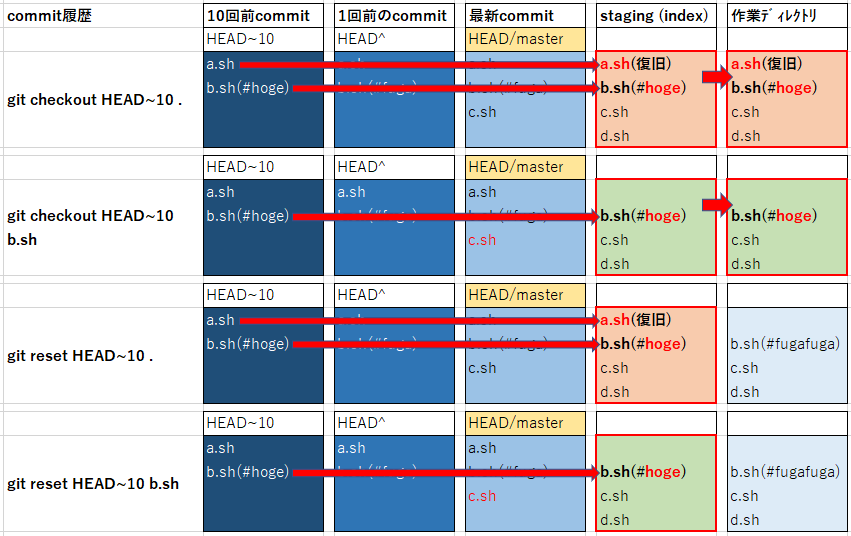
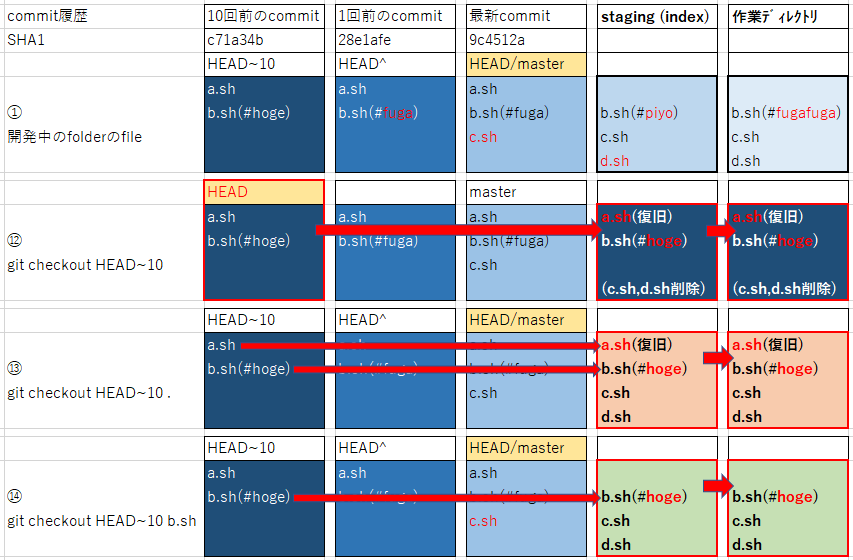
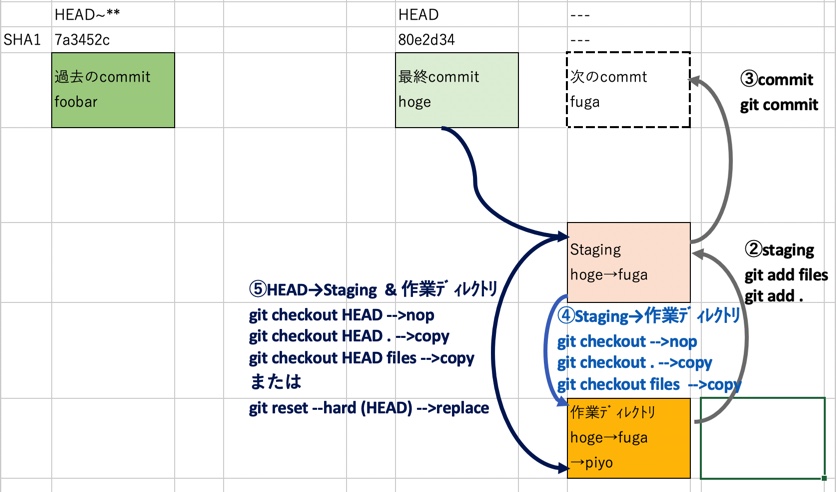
⑥$ git checkout files →fileをstagingから作業ディレクトリに戻す
上記⑤のstagingのfile破棄とは異なり、stagingのfileを作業ディレクトリにCOPYする動作。以下の説明は、a.shをstaging後に追加編集した状態から、その追加編集を取り消してstagingの内容に戻す所までを示す。
% git status              # - staging後にa.shを追加編集した直後
On branch main
Changes to be committed:
  (use "git restore --staged <file>..." to unstage)
    new file:   a.sh

Changes not staged for commit:
  (use "git add <file>..." to update what will be committed)
  (use "git restore <file>..." to discard changes in working directory)
    modified:   a.sh      # - 変更された表示になる
    new file:   b.sh

Untracked files:
  (use "git add <file>..." to include in what will be committed)
    c.sh

$ git checkout a.sh       # - stagingの内容に戻すコマンド
Updated 1 path from the index
$ git status
On branch main
Changes to be committed:
  (use "git restore --staged <file>..." to unstage)
    new file:   a.sh

Changes not staged for commit:
  (use "git add <file>..." to update what will be committed)
  (use "git restore <file>..." to discard changes in working directory)
    new file:   b.sh      # - 変更したa.shが取り下げられて消えた

Untracked files:
  (use "git add <file>..." to include in what will be committed)
    c.sh

$
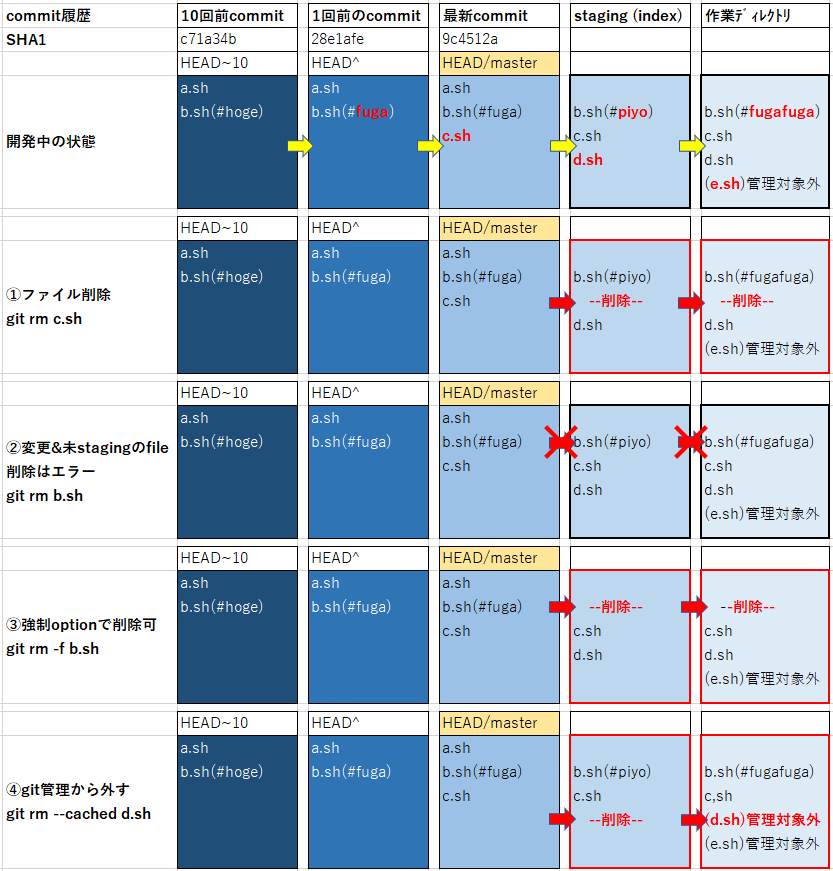
⑦$ git rm --cached files →fileをgit追跡対象から外す
git rmはfileを削除するコマンドだが、 git rm --cashed filesコマンドを使うとfileを残したままGitの追跡対象から外せる。外されたfileは引き続きgitに認識されるので、⑨で説明するfileをGitの認識対象から外す操作が必要になる。
これも対動作になる「②fileをGit追跡対象にする(stagingはしない)」と「⑨fileをGitが認識する/無視する」と合わせた図表で示す。
$ git rm --cached b.sh        # - 上の状態からb.shをgitの追跡対象から外す
rm 'b.sh'
$ git status
On branch main
Changes to be committed:
  (use "git restore --staged <file>..." to unstage)
    new file:   a.sh

Untracked files:
  (use "git add <file>..." to include in what will be committed)
    b.sh                      # - b.shがgitの追跡対象から外れた(認識は継続)
    c.sh

$
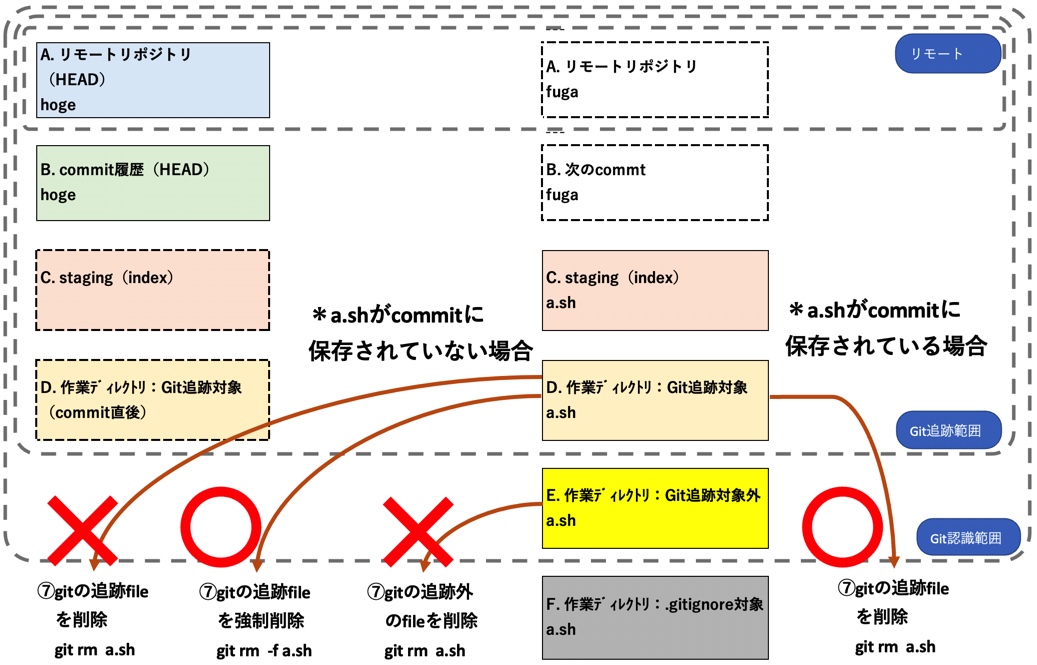
⑧$ git rm files →fileを削除
git rm filesでGit追跡対象fileを削除する。commitされていないfileは失うためエラーになるが強制的な削除も可能(git rm -f files)。
なおGitの追跡対象外のfileをこのコマンドで削除しようとしても(Gitの働きが及ばないfileのため)エラーになるのでその場合はシェルのrm filesで削除する。
$ git rm a.sh            # - staging中のa.shを削除しようとすると・・
error: the following file has changes staged in the index:
    a.sh                 # - 変更された内容を失わない様にエラーで中断
(use --cached to keep the file, or -f to force removal)
$
$ git rm -f a.sh         # - 今度は強制オプションを付けて削除する
rm 'a.sh'                # - 削除された
$
$ git rm b.sh            # - gitの追跡対象外のfileを削除しようとすると・・
fatal: pathspec 'b.sh' did not match any files    # - エラーで中断
$ rm b.sh                # - 代わりにシェルのrmコマンドなら削除出来る
$
⑨$ Vim .gitignore →fileをGitが認識する/無視する
.gitignoreにfile名を登録すると認識対象から外され無視される。その登録を抹消すると再び認識対象になる。なお一旦Gitの追跡対象になったfileはここに記載しただけではGitの追跡対象から外れないので、⑦で記載した方法でGitの追跡対象から外す必要がある。改めて⑦で示した図表を再掲する
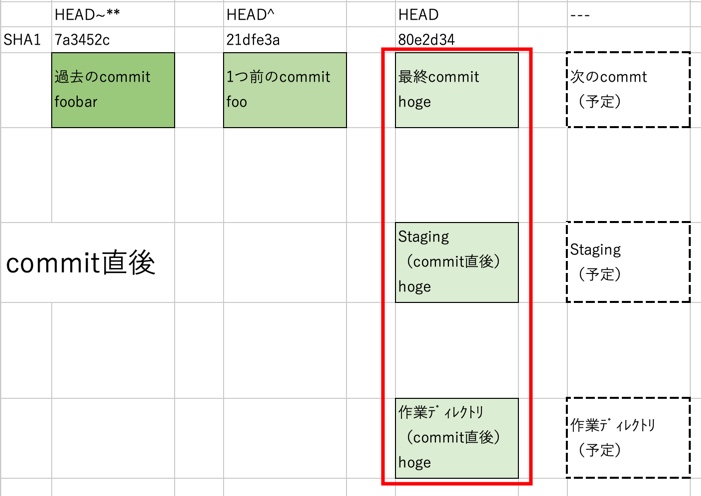
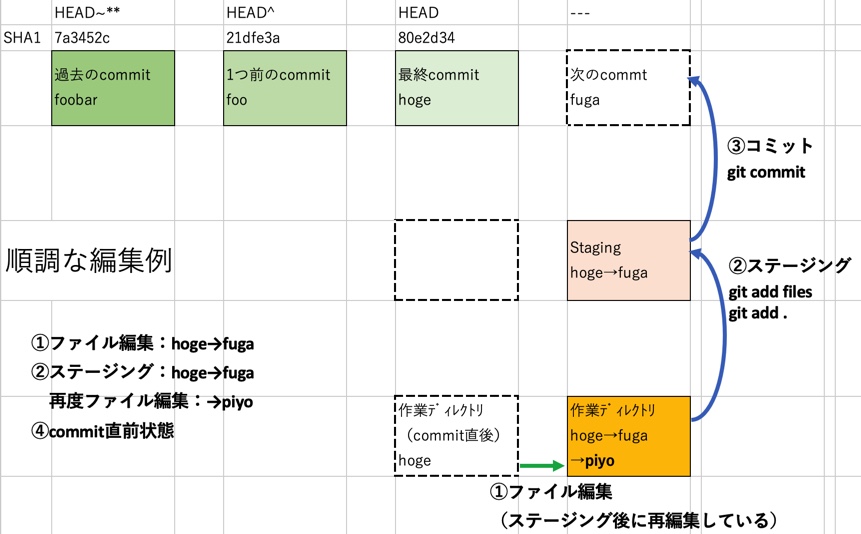
⑩$ git commit →fileをcommit
git commitでfileをcommitする
$ git commit